
本サイトでは、サイバーセキュリティの学習にVirtualBoxを使います。そこで、今回は、VirtualBoxの導入と初期設定について解説します。
まえがき
本サイトではVirtualBoxを使いますが、仮想化ソフトの選択肢としては、
- WSL2(Windows Subsystem for Linux 2)
- VMware
などもあります。
筆者的には、「使いやすく、導入しやすい」という観点から、VirtualBoxを選定しました。
VirtualBoxが導入できないという場合は、上記もお試しください。
1.VirtualBoxとは
VirtualBoxは、Oracle社(主にデータベースやクラウド分野に強いアメリカの老舗IT企業)が開発している仮想化ソフトウェアです。
公式サイトでは、VirtualBoxについて、以下のように紹介しています。
Oracle VirtualBox is a cross-platform virtualization application. That means it extends the capabilities of your existing computer so that it can run multiple operating systems, inside multiple virtual machines (VMs), at the same time.
訳:「Oracle VirtualBoxは、クロスプラットフォームに対応した仮想化アプリケーションです。あなたが使用しているコンピュータの機能を拡張し、複数の仮想マシン内で複数のOSを同時に実行できるようにします。」
引用元:https://www.virtualbox.org/manual/topics/Introduction.html#ct_about-virtualbox
サイバーセキュリティを学ぶ際、学習サイト(Hack The BoxやTryHackMeなど)が用意したマシンを実際に攻撃(ペネトレーションテストと呼びます)する場合があります。
マシンを攻撃するためには、Kali Linuxという便利ツールの用意が必要です。
しかし、Kali Linuxは、Linuxと呼ばれるOSの一種(正確には、ディストリビューションといいます)であり、通常はWindowsやmac上で動きません。
そこで、VirtualBoxを導入すれば、手元のパソコンでKali Linuxを動かせるようになります。
2.VirtualBoxの導入手順
2-1.スペック確認
まずは、自身のパソコンがVirtualBoxを導入できるスペックかどうか確認しましょう。
VirtualBox自体は、512MB以上のRAMと、30MB以上のディスク容量で、導入できます。しかし、VirtualBoxには後でKali Linuxを入れる予定なので、その分のスペックを考慮する必要があります。なので、実際には、以下のようなスペックが必要です。
VirtualBox+Kali Linuxが快適に動く必要スペック
・RAM:8GB以上
・ディスク容量:20GB以上
VirtualBoxの必要スペック(公式サイトから引用)
In order to run VirtualBox on your machine, you need:
・Reasonably powerful x86 hardware. Any recent Intel or AMD processor should do.
・Memory. Depending on what guest operating systems you want to run, you will need at least 512 MB of RAM (but probably more, and the more the better). Basically, you will need whatever your host operating system needs to run comfortably, plus the amount that the guest operating system needs. So, if you want to run Windows 8.1 on Windows 7, you probably won't enjoy the experience much with less than 2 GB of RAM. Check the minimum RAM requirements of the guest operating system, they often will refuse to install if it is given less. Sometimes it malfunctions instead. So you'll need that for the guest alone, plus the memory your operating system normally needs.
・Hard disk space. While VirtualBox itself is very lean (a typical installation will only need about 30 MB of hard disk space), the virtual machines will require fairly huge files on disk to represent their own hard disk storage. So, to install Windows 8, for example, you will need a file that will easily grow to several 10 GB in size.
要約:
・CPU:ある程度の性能のx86(つまりは32ビット)CPU。最近のIntelまたはAMD製品であれば問題なし。
・メモリ(RAM):使いたいOSによるが、最低でも512MB。RAMが足りないと、快適に動かなかったりインストール自体できなかったりする。
・ディスク容量:VirtualBox自体は約30MBでインストール可能。ただし、仮想環境で動かすOS分の容量も必要。
引用元:https://www.virtualbox.org/wiki/End-user_documentation
Kali Linux自体の必要スペック(公式サイトから引用)
System Requirements
The installation requirements for Kali Linux will vary depending on what you would like to install and your setup. For system requirements:
On the low end, you can set up Kali Linux as a basic Secure Shell (SSH) server with no desktop, using as little as 128 MB of RAM (512 MB recommended) and 2 GB of disk space.
On the higher end, if you opt to install the default Xfce4 desktop and the kali-linux-default metapackage, you should really aim for at least 2 GB of RAM and 20 GB of disk space.
When using resource-intensive applications, such as Burp Suite, they recommend at least 8 GB of RAM (and even more if it is a large web application!) or using simultaneous programs at the same time.
要約:
・最低限の構成:RAMは128MB、ディスク容量は2GB。
・高スペックな構成:RAMは2GB、ディスク容量は20GB。
※重いツールも快適に使いたいなら、少なくともRAMが8GBは必要。
引用元:https://www.kali.org/docs/installation/hard-disk-install/
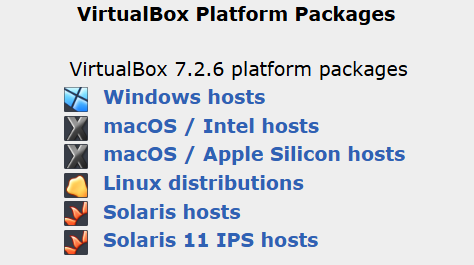
2-2.ダウンロード
本記事では、Windows 11で、インストールを進めていきます。
まずは、公式サイトから、VirtualBoxをダウンロードしましょう。

「VirtualBox 7.2.6 platform packages」の「Windows hosts」をクリックしてVirtualBoxをダウンロードします。
2-3.インストール
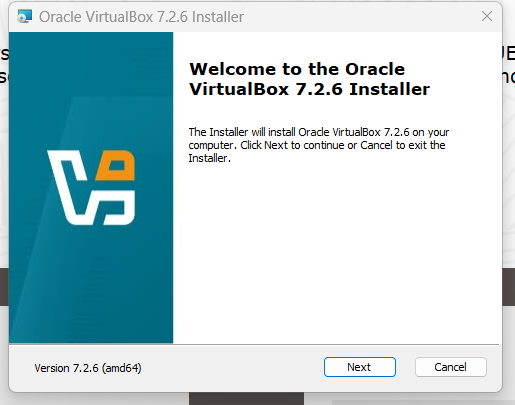
ダウンロードが完了したら、「VirtualBox-~~~~-Win.exe」という実行ファイル
 をクリックして、ウィザードを起動します。
ウィザードのトップ画面が表示されるので、「Next」を押します。
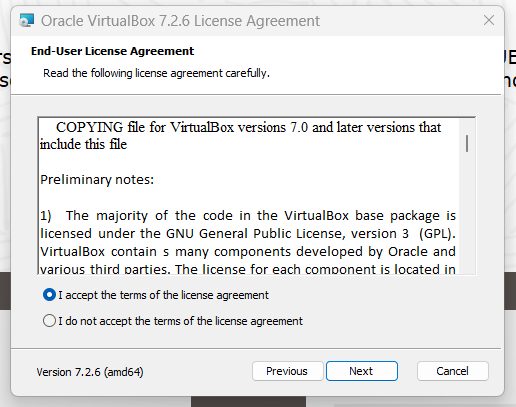
2-3-1.End-User License Agreement
使用許諾に同意するかどうか問われるので、「I accept the terms of the license agreement」にチェックをいれて、「Next」を押します。
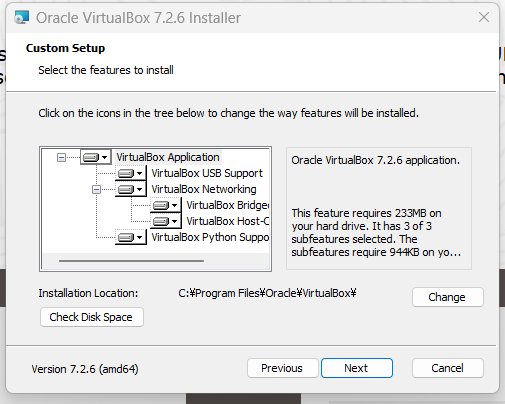
2-3-2.Custom Setup
「click on the icons in the tree below to change the way features will be installed.」という表示と、ツリー状にインストール項目が表示されていますが、今回は特にカスタマイズは必要ありません。
「Installation Location」の項目で、VirtualBoxのインストール場所を確認し、問題なければ、「Next」を押します。
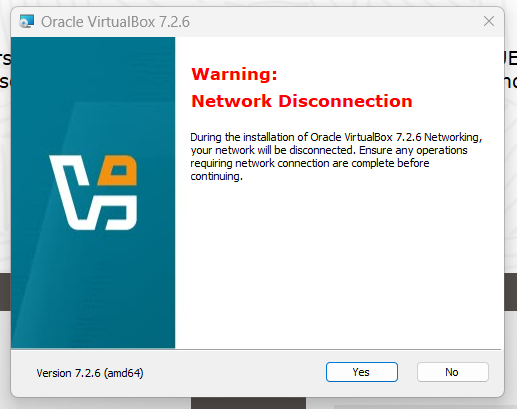
2-3-3.Warning Network Disconnection
「during installation of Oracle virtualBox 7.2.6 Networking, your network will be disconnected. Ensure any operations requiring network connection are complete before continuing.」という警告が表示されます。「インストール中にネットワーク接続が一時的に切断されるので、インターネット接続が必要な操作があれば先に完了しておくこと。」というような意味です。
問題なければ「Yes」を押します。
2-3-4.Missing Dependencies
「Installing the Oracle VirtualBox 7.2.6 Python bindings requires the Python Core package and the win32api bindings to be installed.
You can install and configure these later. For instructions, refer to the Oracle VirtualBox 7.2.6 SDK Programming Guide. Alternatively, install them before continuing with the Oracle VirtualBox installation.」という文が表示されます。VirtualBoxはPythonを使って操作する機能があります。上記の文はこの機能を利用するために必要なパッケージがないという内容です。
今回は必要ないので、「Yes」を押して進みます。
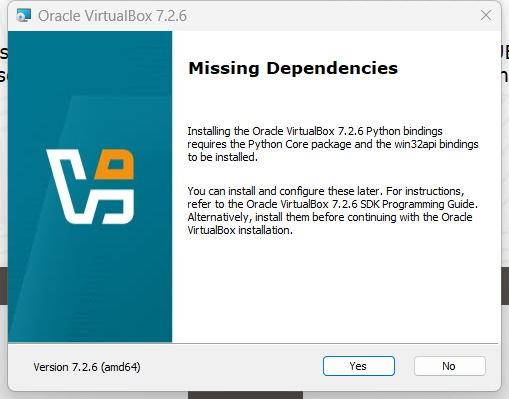
※上記のパッケージは、後からでもインストールできます。
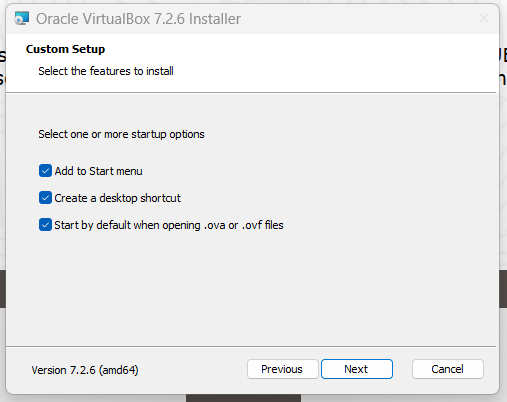
2-3-5.Custom Setup
以下の設定を変更できます。
・Add to Start menu:スタートにショートカットを追加
・Create a desktop shortcut:デスクトップ画面にショートカットを追加
・Start by default when opening .ova or .ovf files:.ovaや.ovfファイルを開くときにVirtualBoxで開く
今回は特に変更せず、「Next」を押します。
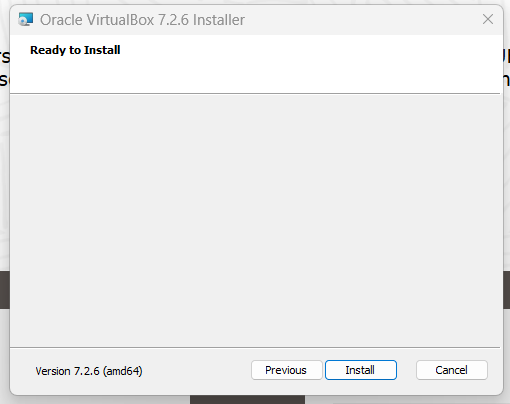
2-3-6.Ready to Install
これで、VirtualBoxのインストール設定は完了です。「Install」を押します。
2-3-7.Oracle VirtualBox 7.2.6 has been installed
インストールが完了すると、
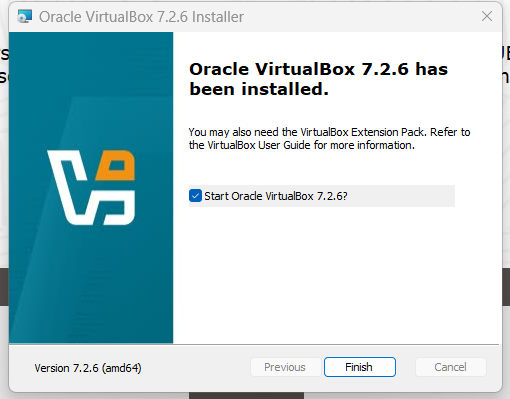
が表示されます。
「Finish」を押してウィザードを閉じましょう。「Start Oracle VirtualBox 7.2.6?」にチェックを入れておくと、ウィザードを閉じたあと、自動的にVirtualBoxが起動します。
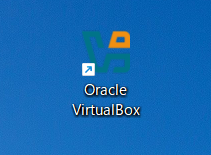
2-4.起動確認
無事にVirtualBoxがインストールできていれば、以下のようなアイコンがデスクトップ画面に追加されます。
なお、VirtualBoxを起動すると、以下のような画面が表示されます。

3.あとがき
これにて、VirtualBoxのインストール完了です。
今後は、VirtualBoxにKali Linuxを導入して、初期設定をします。初期設定が完了したら、いよいよペネトレーションテストの実践に移ります。


